
Today we Will Learn How To Make Image Slider Using HTML and Css
Introduction:
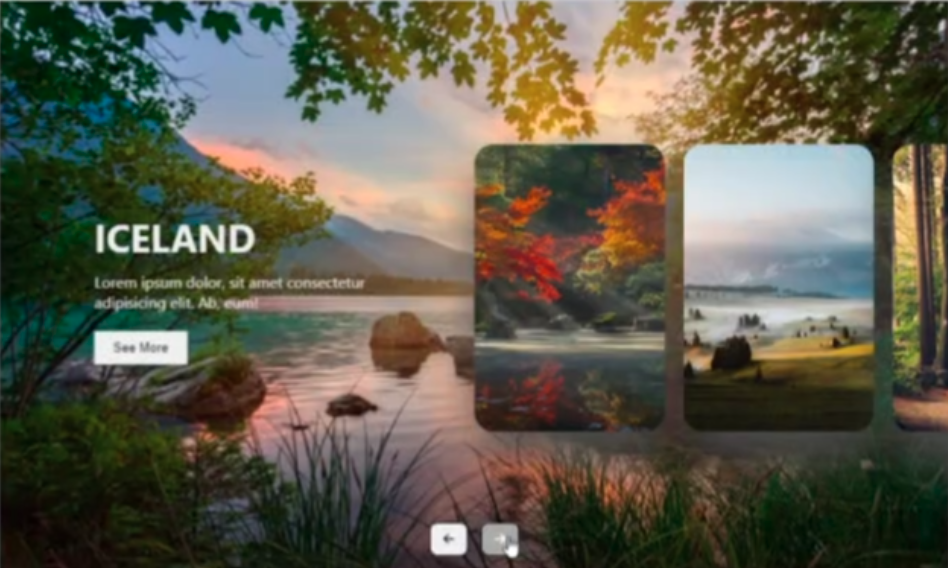
Let’s create a Travel Destinations Slider using HTML, CSS, and JavaScript. This project will showcase various travel destinations in an interactive and visually appealing slider format.
HTML Structure: The HTML sets up a container with multiple destination “items”. Each item represents a location with a background image, name, description, and a “See More” button. Navigation buttons are included for user interaction.
HTML :
<!DOCTYPE html>
<html lang="en">
<head>
    <meta charset="UTF-8">
    <meta name="viewport" content="width=device-width, initial-scale=1.0">
    <title>Travel Destinations Slider</title>
    <link rel="stylesheet" href="https://cdnjs.cloudflare.com/ajax/libs/font-awesome/6.4.0/css/all.min.css" integrity="sha512-iecdLmaskl7CVkqkXNQ/ZH/XLlvWZOJyj7Yy7tcenmpD1ypASozpmT/E0iPtmFIB46ZmdtAc9eNBvH0H/ZpiBw==" crossorigin="anonymous" referrerpolicy="no-referrer" />
    <link rel="stylesheet" href="style.css">
</head>
<body>
    <div class="container">
        <div class="slide">
            <div class="item" style="background-image: url(https://i.ibb.co/qCkd9jS/img1.jpg);">
                <div class="content">
                    <div class="name">Switzerland</div>
                    <div class="des">Lorem ipsum dolor, sit amet consectetur adipisicing elit. Ab, eum!</div>
                    <button>See More</button>
                </div>
            </div>
            <div class="item" style="background-image: url(https://i.ibb.co/jrRb11q/img2.jpg);">
                <div class="content">
                    <div class="name">Finland</div>
                    <div class="des">Lorem ipsum dolor, sit amet consectetur adipisicing elit. Ab, eum!</div>
                    <button>See More</button>
                </div>
            </div>
            <div class="item" style="background-image: url(https://i.ibb.co/NSwVv8D/img3.jpg);">
                <div class="content">
                    <div class="name">Iceland</div>
                    <div class="des">Lorem ipsum dolor, sit amet consectetur adipisicing elit. Ab, eum!</div>
                    <button>See More</button>
                </div>
            </div>
            <div class="item" style="background-image: url(https://i.ibb.co/Bq4Q0M8/img4.jpg);">
                <div class="content">
                    <div class="name">Australia</div>
                    <div class="des">Lorem ipsum dolor, sit amet consectetur adipisicing elit. Ab, eum!</div>
                    <button>See More</button>
                </div>
            </div>
            <div class="item" style="background-image: url(https://i.ibb.co/jTQfmTq/img5.jpg);">
                <div class="content">
                    <div class="name">Netherlands</div>
                    <div class="des">Lorem ipsum dolor, sit amet consectetur adipisicing elit. Ab, eum!</div>
                    <button>See More</button>
                </div>
            </div>
            <div class="item" style="background-image: url(https://i.ibb.co/RNkk6L0/img6.jpg);">
                <div class="content">
                    <div class="name">Ireland</div>
                    <div class="des">Lorem ipsum dolor, sit amet consectetur adipisicing elit. Ab, eum!</div>
                    <button>See More</button>
                </div>
            </div>
        </div>

        <div class="button">
            <button class="prev"><i class="fa-solid fa-arrow-left"></i></button>
            <button class="next"><i class="fa-solid fa-arrow-right"></i></button>
        </div>
    </div>

    <script src="script.js"></script>
</body>
</html>
CSS Styling:
The CSS styles the slider for an engaging visual experience. It centers the container on the page and styles each destination item with rounded corners and shadows. The first two items occupy the full container width, while others peek out from the side.
CSS:
*{
    margin: 0;
    padding: 0;
    box-sizing: border-box;
}

body{
    background: #eaeaea;
    overflow: hidden;
}

.container{
    position: absolute;
    top: 50%;
    left: 50%;
    transform: translate(-50%, -50%);
    width: 1000px;
    height: 600px;
    background: #f5f5f5;
    box-shadow: 0 30px 50px #dbdbdb;
}

.container .slide .item{
    width: 200px;
    height: 300px;
    position: absolute;
    top: 50%;
    transform: translate(0, -50%);
    border-radius: 20px;
    box-shadow: 0 30px 50px #505050;
    background-position: 50% 50%;
    background-size: cover;
    display: inline-block;
    transition: 0.5s;
}

.slide .item:nth-child(1),
.slide .item:nth-child(2){
    top: 0;
    left: 0;
    transform: translate(0, 0);
    border-radius: 0;
    width: 100%;
    height: 100%;
}


.slide .item:nth-child(3){
    left: 50%;
}
.slide .item:nth-child(4){
    left: calc(50% + 220px);
}
.slide .item:nth-child(5){
    left: calc(50% + 440px);
}

/* here n = 0, 1, 2, 3,... */
.slide .item:nth-child(n + 6){
    left: calc(50% + 660px);
    opacity: 0;
}


.item .content{
    position: absolute;
    top: 50%;
    left: 100px;
    width: 300px;
    text-align: left;
    color: #eee;
    transform: translate(0, -50%);
    font-family: system-ui;
    display: none;
}

    .content button:hover {
        color: #FFFFFF; /* White */
        background-color: #FF8C00; /* Dark orange */
    }


.slide .item:nth-child(2) .content{
    display: block;
}


.content .name{
    font-size: 40px;
    text-transform: uppercase;
    font-weight: bold;
    opacity: 0;
    animation: animate 1s ease-in-out 1 forwards;
}

.content .des{
    margin-top: 10px;
    margin-bottom: 20px;
    opacity: 0;
    animation: animate 1s ease-in-out 0.3s 1 forwards;
}

.content button{
    padding: 10px 20px;
    border: none;
    cursor: pointer;
    opacity: 0;
    animation: animate 1s ease-in-out 0.6s 1 forwards;
}


@keyframes animate {
    from{
        opacity: 0;
        transform: translate(0, 100px);
        filter: blur(33px);
    }

    to{
        opacity: 1;
        transform: translate(0);
        filter: blur(0);
    }
}


.button{
    width: 100%;
    text-align: center;
    position: absolute;
    bottom: 20px;
}

.button button{
    width: 40px;
    height: 35px;
    border-radius: 8px;
    border: none;
    cursor: pointer;
    margin: 0 5px;
    border: 1px solid #000;
    transition: 0.3s;
}

.button button:hover{
    background: #ababab;
    color: #fff;
}
JavaScript Functionality:
The JavaScript handles the slider’s interactivity. Event listeners on the navigation buttons move the destinations in a carousel-like manner. The ‘next’ button moves items forward, while the ‘prev’ button moves them backward, creating a seamless, infinite scrolling effect.
JS:
let next = document.querySelector('.next')
let prev = document.querySelector('.prev')

next.addEventListener('click', function(){
    let items = document.querySelectorAll('.item')
    document.querySelector('.slide').appendChild(items[0])
})

prev.addEventListener('click', function(){
    let items = document.querySelectorAll('.item')
    document.querySelector('.slide').prepend(items[items.length - 1]) // here the length of items = 6
})
This Travel Destinations Slider project combines HTML structure, CSS animations, and JavaScript functionality to create an interactive showcase of travel locations. It’s designed to be visually appealing and user-friendly, allowing visitors to explore different destinations effortlessly.
If Your Project is Not Working or Has Any Problem Don’t Worry, Just Click on Below Download Assets File And You Will Be Able To Get Full Control Of Our Projects , Then Customize And Use it For Your Coding Journey. Let the coding adventure begin!